Printing Money at Home: How to run Idena on Raspberry Pi 4 and mine DNA

Background:

Idena is a “Proof-of-Person blockchain” as described on its website. Compared to Bitcoin where the original idea is “one CPU one vote”, now every person in the physical world enjoys only one vote in the Idena network. This makes it possible for ordinary users to mine coins at home without having to purchase power-consuming dedicated miners or servers.

Idena created a novel way to prove the humanness and uniqueness of on-chain identities. It asks all the users around the world to participate in an AI-hard turing test at the same time. That means you can only pass the test by yourself and are not able to maintain multiple valid identities because software just won’t help to pass the exam which is simple for human to solve (choose between two sets of 4 pictures the one that tells a meaningful story rather than nonsense).

Once you pass the turing test you can start to mine DNA coins. Just leave your computer always on and keep the Idena node software online. However, if you’re mining with a desktop machine it probably will comsume extra power or if you use a laptop you’ll be offline when you want to take it to other places. So this is the point where Raspberry Pi comes in.

According to the official FAQ, the minimum configuration for an Idena node to run is as follows:

  • Linux/x64
  • 1 CPU core
  • 2 Gb RAM
  • 100 Gb HDD
  • 100 Mbps uplink

The new Raspberry Pi 4B will definitely do the job for us. It’s a credit-card sized computer that only costs $45 for the 2GB RAM version. It’s so small that even if you turn it on 24*7 it consumes very little power. The blockchain data for Idena network now is quite small and isn’t growing too rapidly so I don’t think you’ll need a 128GB microSD for storage. Just pick a 32GB one and you’ll be fine. In this tutorial, I’ll use Raspberry Pi 4B as an example to show you how to run Idena node on it to mine DNA coins. Of course you can choose the 4GB or 8GB RAM version and use it with larger SD card such as 128GB if you plan to use it for other purposes in the future.

Steps:

Let’s assume that you have successfully set up your Raspberry Pi 4 according to the official tutorial and have installed Ubuntu on it following the official guide. Now let’s move on to the Idena part!

1. Compile idena node from source

The idena-go repo doesn’t provide pre-built binaries for arm architectures so we have to compile it from source. Since it’s written in golang, we first install go:

~$ sudo apt install golang-go

Then pull the source code to local directory:

~$ git clone https://github.com/idena-network/idena-go.git

Enter into the directory and build. Because we later need the frontend to know which version of idena node we’re currently running, it’s necessary to add a version number when compiling. Usually we mark it as the same version as the latest release (e.g., 0.21.3).

~$ cd idena-go/

~$ go build -ldflags "-X main.version=0.21.3"

When it’s done you’ll see the executable in the current working directory. Let’s move it out and give it a new name:

~$ mv idena-go ../idena-node-arm64-0.21.3

Before running the node, put the recommended configure file into the same directory with the node executable file.

~$ cd ../

~$ wget https://idena.io/examples/guide-remote-1/config.json

~$ ./idena-node-arm64-0.21.3 --config=config.json

You’ll see it running and outputting status messages into the CLI. Press Ctrl + C to terminate the node. You don’t want to run the node like this because the process may be accidentally killed for various reasons which leads to mining penalty for being offline, so we need another program to protect the process.

2. Use supervisor to daemonize idena node

Supervisor is a great tool to make Idena node run in the background without interruptions. Installing is easy with just one line of command on Ubuntu:

~$ sudo apt install supervisor

Then edit the supervisor configuration file for Idena. Create a config file and open it with your favourite editor (“nano” here for example).

~$ sudo nano /etc/supervisor/conf.d/idena.conf

Paste the following block into the config file and press Ctrl + X to exit and then press “Y” and then the “Enter” key to save.

[program:idena]
command=/home/ubuntu/idena-node-arm64-0.21.3 --config=config.json
directory=/home/ubuntu/
autostart=true
autorestart=true
stderr_logfile=/var/log/idena/error.log
stdout_logfile=/var/log/idena/stdout.log
user=ubuntu

Now we start supervisor first and then tell supervisor to start idena:

~$ sudo supervisord
~$ sudo supervisorctl
supervisor> update

You’ll see supervisor reporting idena RUNNING. If your Raspberry Pi is powered off accidentally, Idena will automatically be started when you power on the machine again.

Note: remember to open port 40405 if you are behind a router/firewall.

3. Connect to the node with front-end

Now your Idena node is running in the background and we need a UI to connect to it for more convenient interactions. Grab the latest release here for your OS and install it .

Before running the front-end program, we need to get two parameters. On Raspberry Pi you’ll find an automatically created directory called datadir. reveal the API key in it by issuing this command:

~$ cat ./datadir/api.key

Then we build an ssh tunnel for the front-end to connect to the Idena node. On your desktop machine run the following command. This is for Linux and Mac OS. Windows users can use third-party tools such as Putty.

~$ ssh -L 9998:localhost:9009 [email protected]

Where 192.168.1.2 is the internal IP address of your Raspberry Pi. Replace it with your own. Now let’s open idena-desktop that we just installed.

Idena-desktop settings page

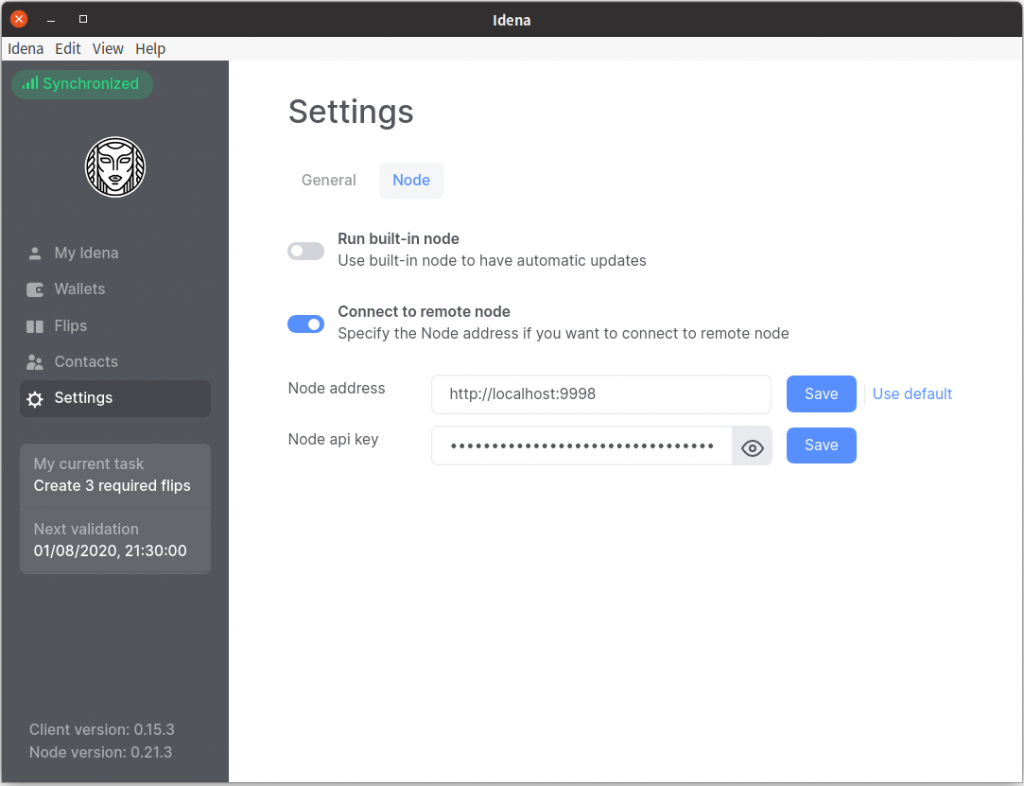
Click “Settings” –> “Node”, switch off “Run built-in node” and switch on “Connect to remote node”. In the Node address box input: http://localhost:9998 and in the Node api key box just copy and paste the API key we got in the last step.

Now you should be connected to the node. Leave it running for some time, depending on the blockchain size and your bandwidth, and you’ll see a green sign on the top-left corner indicating that you’ve caught up to the latest block.

What’s next? Validate your identity by participating in the Turing test and then turn on the mining option in idena-desktop. Your Raspberry Pi will mine DNA coins 24*7 for you! Go to Idena website to explore more on this project.

我对跨境电商的探索(系列第0、1篇)

这个念头的起源其实不算久。去年年底研究爱沙尼亚 E-residency 的时候偶然听说了一个新词汇叫 Digital Nomad,然后觉得有些着迷,再摸索下去发现从做跨境电商开始是最自然而然的尝试了。

我当时觉得做跨境电商的几个基本技能需求大概是:英语、建站和广告,而刚刚好自己是一个英语专业出身的在广告公司干过一段时间的自学业余程序员,于是一拍脑袋,这事儿特么就是等着我来做的啊!

过年在家因为疫情哪里也去不了,于是开始认真钻研起来,读了很多过来人的博客,边看边实践,也就很快把架子搭好了:Wordpress 建站,买了当时热销的 Avada 主题,搭配 Woocommerce 插件处理电商业务部分,基本上算是开源方案标配。

收款方案最后选择了 Stripe 而非 Paypal 的原因比较繁多,最显而易见的是前者费率更低,其次是对个人商户友好,并且支持主流信用卡付款,而这正是大部分海外客户线上购物首选的支付方式。碰巧的是之前因为购买香港保险,顺带把香港银行帐号和手机号全都办好了,以至于水到渠成(目前Stripe不在大陆运营)。

当时其实我已经想开始记录这一切了,如果开始写的话那么算是 Chapter 0,但一是因为心里的不确定,二是拖延的习惯。于是到了今天,我收到了第一笔订单,才有足够动力把 Chapter 1也一并写了。

实际上上面描述的仅仅是非常基本的准备工作,毕竟你是电商,最重要回答的问题是:你提供什么产品?而这也是我最不确定的地方。对于新手来说最低成本的方法当然是做 Dropshipping,不囤货,只做中间商赚差价。当时可选择的有2个方案,一是在 Aliexpress 选品,二是另一个专门为 dropshipper 提供精选货品的门户叫 Spocket。而二三月的时候国内所有快递停运,阿里显然无法发货,更别提跨境发货,于是自然选择了后者,其中绝大多数货品都是欧美本地生产本地仓库发货,也就是说,我这个身在中国坐在电脑前的“局外人”想要通过一些附加服务来抽取发生在大洋彼岸每笔交易的提成。

作为尚未掌握方法论的新人,选品当时只是先凭感觉,然后试错。一股脑添加了40来个不明所以的产品后,小店算是正式上线了。然后一晃而过的两三个月,穿插做了些别的事情以及工作效率的低下,导致小站硬生生荒废了很长时间,而 Spocket 上选品是收取月费的,于是也被白白扣了一些钱。知道前一个月才重新拾取,开始投放广告了。

之前在广告公司工作主要是投放 Facebook Ads,但又听说实际上 Google Ads对于电商可能回报率更高一些,加上反而想要尝试自己不熟悉事务的心理,于是事先尝试了 Google Shopping Ads,预算设置的是$150每月,而在 WooCommerce 合作方 Kliken 投放时又另外赠送$150,打算等熟悉后再自行开户投放。其实投放这么久到现在数据自认为是不好看的,CTR仅仅在0.6%,而一个点击竟然到了0.5刀。

佛系投放了大半个月,本来想找时间好好优化一下漏斗各个环节,甚至因为怀疑选品的问题打算复制一个新站尝试另一套不同品类的产品。也就在这时突然收到邮件:Order #00000 has failed,什么?!又惊讶又欣喜又遗憾,竟然莫名就来了第一笔订单,然而订单却处理失败!仔细研究后发现,我集成的 Stripe 仅支持信用卡付款,而用户偏偏使用了借记卡。稍作冷静后打算给用户发一封邮件请她重新使用信用卡付款,并附上了一个优惠码,然后就在想着措辞的时候,又来了第二笔订单并且支付成功!!

我的第二张订单,亦是第一张成功的订单。

在喜悦中给第一位客户发了邮件后,觉得心情已经开始激动,这是从0到1的感觉,这太棒了!处理好第二份订单的后续工作然后就出门散步了,“那些东西大麻都不能给你”,我边走边想。也许往后是否能盈利仍然是不确定的,但从无到有的感觉真是太美好了,这应该就是创业的乐趣了,虽然只是小剂量。

这两篇合二为一的总结可能会过于概括,但是仔细看了下如果挑出每个点展开叙述又会让文章极其冗长。也许在这个计划的系列之外,会挑选一些有意思的点单独成文来详细讲述,主要偏向于分享经验和小技巧吧。

微信公众号服务:将用户发来的图变成海报

这个想法是草地音乐某次活动海报做得非常简单,直接用了一张往期的照片,贴上了活动地点的文字。于是想到其实可以让大家用自己的照片做成海报来玩。

想到最直接的交互就是从微信公众号了,不需要写什么专门网页,你发我一张图,我回你一张图,非常简单高效。后来用python写一个flask服务,图像处理就用PIL,写出来也非常快。

再后来发现可以有更多有趣的玩法,比如除了海报,还可以生成一些比如LOMO风格、黑白风格等照片,或者加上你的二维码等等,后来也做了一些。随便贴一张示例,毕竟一图胜万言嘛。


再到后来圣诞节想到,可以用人脸识别,在图片里找出脸的位置,然后在上方贴上圣诞帽的图层,也会非常有喜感,这个和最近比较火的很多自拍类软件自动加上猫胡须什么的其实原理是一样的。

代码已经开源了,点击这里可以看到,后面可以发挥想象力再做一些有趣的东西,不限于图片的交互,可能声音啊视频啊都可以有趣起来。

Audacity音频编辑器简介

Audacity是一款跨平台的开源软件,主要功能是多轨音频录制和编辑,适合日常的音频剪辑比如截取手机铃声、制作Podcast,同样也适合简单的音乐录制和处理,虽然比不上录音棚里的专业软件,但是平时简单录一些demo,或者卡拉OK贴唱什么的还是能够胜任的。下面简单介绍一下安装方法,以windows和mac os x为例,linux用户请根据自己的发行版自行安装。安装大概是三个步骤:安装主程序、安装解码器、安装插件。

项目主页: http://audacity.sourceforge.net   可先行围观一下……好,开始!

1、安装主程序

Windows用户请点这里下载安装包,Mac用户点这里,安装完成后则可以正常使用,不过,还有一些额外的功能需要安装一些其他东西,比如解码器和插件。

2、安装解码器

Audacity默认只支持导入导出WAV格式的文件,原因简单解释一下:因为audacity是根据GPL协议发布的自由软件,而有些解码器(比如用于mp3的lame)是有专利的,和GPL协议冲突,所以发布的时候不能把解码器打包进去,用户需要的话必须自行下载。

如果需要支持mp3格式,则需下载lame解码器,windows用户请点这里下载,mac用户请点这里,安装好后即可支持mp3文件的导入导出。

如果需要更多格式支持,比如wma、m4a、ac3等等,则需下载ffmpeg解码器,windows用户请点击这里,mac用户请点这里下载,然后安装即可。

注意,在安装解码器的时候,请不要更改默认的安装路径,安装完成后重新打开audacity应该就可以正常使用。

3、安装插件

很多功能是通过插件实现的,audacity主要支持三种格式的插件,具体说明请查看官方的指南(英文),这里简单介绍一下LADSPA格式插件的安装。Windows用户请点击这里,下载后直接安装即可,mac用户请点这里下载,下载后将压缩包中的Archive文件夹里的所有文件解压到 Mac Hard Disk > Applications > Audacity > Plug-Ins 目录里。再次打开audacity即可发现“效果”菜单多出很多选项。

好了,有这么些基本上够用了,折腾起来吧!大多数问题可以去官网上查阅用户手册。掌握基本操作和功能后,可以尝试各种插件各种效果,后面好玩的主要就是这些,网上各种插件琳琅满目,有得折腾的。当然别忘了,工具还是要为了音乐服务,不能本末倒置了。

用Android手机遥控电脑上的Clementine播放器

Clementine一直没停止过给我惊喜!!

用手机控制电脑播放这个功能真是太赞了,且不论是不是因为人懒。假设你躺在床上看书,电脑在放音乐,然后你想换歌或者暂停什么的,但是冬天天冷不想下床,怎么办?

或者你像我这样的整天不关电脑,然后出门了,突然想听你电脑里收藏的一些歌,怎么办?直接用clementine遥控,从你电脑的曲库里下载音乐

好,我们来看看怎么设置吧!前提是你有一部android手机和一台电脑。

首先你需要在电脑上安装clementine 1.2版本以上,直接去官网下即可,咱们跨平台小橘子,管你是土豪mac、屌丝win、极客linux,都有对应版本。

然后手机去play store搜索一个app叫clementine remote,如果由于各种原因装不了,直接点这里去官方下载apk包(在页面最下方),然后自行安装。

现在,打开电脑上的clementine,找到偏好设置,网络遥控这一项

2014-01-12-224636_832x749_scrot

1、把“Use a network remote control”勾上

2、Port(端口)可以不用改,但是如果你的电脑装了防火墙,别忘了把对应端口开放。

3、“Only allow connections from the local network”选项:如果你只想在内网范围内使用,即电脑和手机都在一个网络里(比如都接入校园网、或者在同一个路由器后面等等),那么就勾上,相应也更安全一点。但是有些情况,比如你出门在外了,想要从自己电脑里下载音乐,那就去掉这个勾。

4、“Require authentication code”选项:为了安全,勾上,输入几个数字,一会儿连接时候需要这个数字来做验证。

5、“Allow downloads”选项:如果你想用手机下载电脑里的音乐,就勾上。

你的IP地址就显示在选项里,一会儿连接的时候就输入这个IP。但是注意,如果你的电脑在内网(校园网、路由器后面等等),手机则必须也在同一个内网(即通过wifi连接这个网络),否则不能连接。如果你的手机直接用流量上网,那就是在公网了,这时候你的电脑也必须在公网(即拥有公网IP,一般宽带拨号上网没用路由器的都是在公网)。

现在,打开手机上的遥控app,输入刚刚选项里显示的IP地址,然后输入authentication code那边你写的数字验证码,不出意外的话,就可以连接上电脑的clementine了,操作手机就和操作电脑上的播放器一样。

播放!尽情享受吧!!

Screenshot_2014-01-12-22-48-55

用Python批量下载豆瓣小站的音乐

原理很简单,豆瓣小站的网页HTML看了一下,每首歌的名字和地址都写好了在里面,只是每次载入地址是不一样的而已。用urllib读取一下,分析出里面的名字和地址,然后下载即可。

先看效果图,上面是命令行的运行结果,左边是代码,右边是拖回来的文件,成就感满满!

Screenshot - 061013 - 21:53:00

最后附上python3.2示例代码:

import urllib.request
from urllib.request import urlopen
import re,os

url = input('Please enter the URL of the douban site.\n(E.g., http://site.douban.com/quinta-diminuita/)\n')
content = urlopen(url).read().decode('utf-8')
#分析音乐人名称并创建相应目录
site_name = ''.join(re.findall('<title>\n\s*(.*?)</title>', content, re.DOTALL))
artist = site_name.replace('的小站\n(豆瓣音乐人)','')
print('Preparing to download all the songs by '+artist+'...')
if os.path.exists('./'+artist) == False:
	os.mkdir('./'+artist)
#分析出所有房间地址
roomlist = re.findall('<div class=\"nav-items\">(.*?)<\/div>', content, re.DOTALL)
roomurl = re.findall('href=\"(.*?)\"', roomlist[0])
#对于每个房间,如果有播放列表,则分析每个列表中的歌曲名和对应地址,然后下载
for h in roomurl:
	content = urlopen(h).read().decode('utf-8')
	playlist = re.findall('song_records\s=\s\[(.*?)\]\;\n', content, re.DOTALL)
	if playlist != []:
		for i in playlist:
			playlist_spl = re.split(r'},{', i)
			for j in playlist_spl:
				song_title = ''.join(re.findall('\"name\"\:\"(.*?)\"', j))
				song_title = ''.join(song_title).replace('\\','')
				song_title = ''.join(song_title).replace('/','.')
				song_url = re.findall('\"rawUrl\"\:\"(.*?)\"', j)
				song_url_str = ''.join(song_url).replace('\\','')
				filepath = './'+artist+'/'+song_title+'.mp3'
				if os.path.isfile(filepath) == False:
					print('Downloading '+song_title+'...')
					urllib.request.urlretrieve(song_url_str, filepath)
				else:
					print(song_title+' alreadly exists. Skipped.')
print('All the songs have been downloaded (if there are any). Enjoy!')

用Python批量抓取豆瓣日志

昨天在豆瓣看到有人发状态问如何把豆瓣日志保存到本地,正好最近在学python,就想到用python写一段小程序,练练手。

解析HTML用的是BeautifulSoup库,看了一下文档,还算简单,但是有些奇怪的问题我一时弄不清楚为什么,所以部分功能是用了比较曲折的方法实现的……

用法:运行这段程序时,将用户名作为参数,如果你没有设置豆瓣的用户名,那就是一串数字,也就是你个人主页的网址里“people”后面那一串,例如(以当初提问的这位同学为例):

~$ python crawl.py duanzhang >> blogbackup.txt

效果如下:

2013-07-16-221457_532x740_scrot

有个功能缺陷是,如果日记里有图片,只能抓到那部分的HTML代码,有兴趣的同学可以继续扩充,但是估计就要想着保存为网页文件了,以便原貌呈现图文混排,当然,也可以仅仅作为备份,把图片抓下来保存在同一个目录里,大家根据自己需求修改吧。

好了,少废话,上代码:

from bs4 import BeautifulSoup
import urllib2
import re
import sys
	
def get_each_blog(url):
	content = urllib2.urlopen(url)
	soup = BeautifulSoup(content)
		
	header = soup.find_all("div", attrs={"class": "note-header"})
	title = header[0].h1.get_text()
	date = header[0].span.get_text()
	print(title.encode("UTF-8"))
	print(date.encode("UTF-8"))
	print('\n')
	
	body = soup.find_all("div", attrs={"class": "note"})
	body = str(body[1])
	body = body.replace("""<div class="note" id="link-report">""", "")
	body = body.replace("</div>", "")
	body = body.replace("\n", "")
	body = body.replace("<br/>", "\n")
	print(body)
	print('\n')
	print('\n')

def link_list(pageurl):
	content = urllib2.urlopen(pageurl)
	soup = BeautifulSoup(content)
	urllist = soup.find_all("div", attrs={"class": "rr"})
	for i in urllist:
		blog_url= ('http://www.douban.com/note/'+(i['id'].split('-'))[1])
		get_each_blog(blog_url)

baseurl = "http://www.douban.com/people/{0}/notes/".format(sys.argv[1])
content = urllib2.urlopen(baseurl)
soup = BeautifulSoup(content)
link_list(baseurl)
page_list = soup.find_all("link", rel="next")
while page_list != []:
	pageurl = page_list[0]['href']
	link_list(pageurl)
	page_list = BeautifulSoup(urllib2.urlopen(pageurl)).find_all("link", rel="next")

国外购买的kindle阅读中国亚马逊电子书的方法

万年不更新的博主今天终于找到了个话题。

最近kindle在中国亚马逊(以下简称中亚)有售了,但是只有paperwhite和fire HD,官网说,如果你有在国外购买的这两款机器,那么可以重新注册到z.cn来购买阅读中亚的电子书,但是如果是其他型号的阅读器,则暂时不可注册,只能使用阅读软件(for android、mac、pc等等)。

不巧,我买的是kindle(这是啥型号,后面啥词都没有,就是那种最原始的),但是又想看中亚的书,怎么办?方法如下(适用于windows和mac系统,linux可能要wine实现):

1、安装中亚官方的kindle阅读器,然后有中亚帐号登录,注意,如果你是卓越老用户,可能用户名不是邮箱地址,需要先在amazon.cn登录界面选择更改邮箱地址才行。

2、在阅读器里将你在中亚购买的书下载到本地,文件会保存在你的文档里一个叫My Kindle Content的文件夹里,格式是azw的。

3、由于这个文件是有保护的(DRM),所以现在还没法随意转换格式或拷贝到其他机器。接下来安装calibre电子书管理器,安装好后运行并设置kindle相关的帐号和邮箱啥的,主要用来向自己设备上推送(也可以跳过设置)。然后去下载calibre的deDrm插件,用来移除DRM保护,在tools_v6.0.7.zip压缩包里能找到这个插件,在calibre界面,点选项,然后点插件,再点“从文件导入插件”,选择那个压缩包里的插件的那个zip包,导入之后重启calibre软件即可。

4、在calibre里添加书籍,把第三部里找到的azw文件导入进去,期间会自动移除DRM保护,然后就可以看到书名在列表里了,选中之后转换为mobi格式,通过usb拷贝到你的kindle里(或者通过个人文档服务推送)即可正常阅读。

在Arch下获得Lenovo A60手机的Root权限

手里有个联通充花费送的联想A60,虽然配置低端,但是搭载Android系统,功能还是齐全的,打算先用一阵子。不过有很多联通制定的软件,需要删掉的话必须有root权限,于是折腾开始了。

一、安装Android SDK,可以通过aur搞定,装这两个包:android-sdk和android-sdk-platform-tools,当然也可以去官方网站下载,手动安装。

二、修改udev的规则,让其识别手机(参考arch wiki)。

1、通过USB连接手机,执行lsusb命令,得到一行类似下面的信息:

Bus 002 Device 006: ID 0bb4:0c8d High Tech Computer Corp.

其中“0bb4:0c8d”前四位是[VENDOR ID]后四位是[PRODUCT ID]

2、根据以上信息修改/etc/udev/rules.d/51-android.rules文件(如果没有则新建一个),加入下面三行内容(将其中的ID部分按照上一步的信息替换掉):

SUBSYSTEM==”usb”, ATTR{idVendor}==”[VENDOR ID]”, MODE=”0666″
SUBSYSTEM==”usb”,ATTR{idVendor}==”[VENDOR ID]”,ATTR{idProduct}==”[PRODUCT ID]”,SYMLINK+=”android_adb”
SUBSYSTEM==”usb”,ATTR{idVendor}==”[VENDOR ID]”,ATTR{idProduct}==”[PRODUCT ID]”,SYMLINK+=”android_fastboot”

3、保存之后运行 sudo udevadm control –reload-rules 来使其生效。

三、准备破解工具,到这里下载一个包,里面用到的是zergRush, Superuser.apk, su-v2, busybox这些文件,将它们找出来,然后找个地方放一下,这里以放在我的home里为例。

还有,在手机上打开USB调试:设置——应用程序——开发——USB调试,勾上即可。

四、开始破解

1、进入SDK的工具目录(我不知道为何aur安装的这玩意儿路径不对)

cd /opt/android-sdk/platform-tools

2、通过USB连接手机,运行 adb devices 命令,看结果是不是类似(如果不能连接,参见wiki)

List of devices attached
0123456789ABCDEF    device

3、开始了!

$ sudo su (自己的电脑先取得root权限)
# adb push /home/me/zergRush /data/local/tmp  (拷入zergRush)
# adb shell chmod 777 /data/local/tmp/zergRush   (修改权限)
# adb shell /data/local/tmp/zergRush  (执行它开始破解)
接下来会看到闪过一些字,最后成功:
[+] Rush did it ! It’s a GG, man !
[+] Killing ADB and restarting as root… enjoy!

继续执行下面的命令:

# adb shell  (进入手机的shell)
# mount    (查看挂载信息)
/dev/block/mtdblock11 /system yaffs2 ro,relatime 0 0   (其中一行:/system的挂载位置)
# mount -o remount,rw -t yaffs2 /dev/block/mtdblock11 /system   (将其重新挂载为可写)
# exit (退出手机终端)

# adb push /home/me/Superuser.apk /system/app/Superuser.apk  (拷入三个文件,下同)
# adb push /home/me/su-v2 /system/bin/su
# adb push /home/me/busybox /system/bin/busybox
# adb shell chmod 4755 /system/bin/su   (修改su的权限)
# mount -o remount,ro -t yaffs2 /dev/block/mtdblock11 /system  (重新挂载为只读)
# reboot (重启手机)

大功告成!

参考链接:
https://www.deleak.com/blog/2010/12/17/android-root-on-linux
http://jbakshi.50webs.com/Linux_tutorial/rootA60/rootA60.html
https://wiki.archlinux.org/index.php/Android-sdk
http://www.kunli.info/2009/08/22/archlinux-android-adb-recognize-device/
http://products.mobileuncle.com/thread-68318-1-1.html  (查看哪些可刪哪些不可刪)

Arch Gnome 3 下编译 Eva 未遂

上次写过一篇在ubuntu 10.10下编译eva,比较简单,因为那个时候源里是有eva的,况且我安装过,所以运行需要的环境是有了,然后就是build-dep这个好东西可以自动安装好编译所依赖的包,很遗憾,ubuntu 11.04源里不再有eva,至于arch,那就更没有了,AUR里有一个比较旧的版本,我没有尝试,而是直接去sourceforge下了比较新的源码。

首先是./autogen.sh生成configure脚本,然后就开始简单的./configure,当然,也是在这里走不动了。

事先知道装两个包,kdelibs和qt,然后发现说找不到kde-config,后来知道是因为现在这个包叫kde4-config了,于是ln -s建立一个软链接,过去了。

接着是Qt的问题,说是找不到lib和header,后来装了个qt-private-headers这个包,不起作用,然后网上搜一下,说qt库在/opt/qt/lib/,因为我是64位,我甚至还建立的一个叫lib64的软链接到lib,仍然无效,后来加了一个后缀,./configure –with-qt-dir=/opt/qt/,终于通过。

接着有来了个KDE的问题,我加了–prefix=`kde-config –prefix`,但是却不能找到KDE的库,我也学着上面建立了个kde的软链接到kde4,仍然无效,最后卡死在这:

checking for KDE… configure: error:
in the prefix, you’ve chosen, are no KDE libraries installed. This will fail.
So, check this please and use another prefix!

考虑的明天要早起去学校,也就没了耐心,就此作罢,但是我感觉隐约中学到了一些东西,有了新的体会,实际上编译就是把源码make成bin,但是源码太复杂,所依赖的lib也太复杂,各个distro上这些lib版本不一样,位置不一样,于是有了configure之类的东西,问题是这个程序是很多年前的,估计configure里面写的东西和现在不太符合了,实际上这个东西还是可以编译的,我觉得如果是对系统和变成了解很多的人甚至可以不用这个东西,一条一条敲命令编译好,当然没人会这样做。估计是可以根据自己的系统,改改confugure,把依赖的包位置都找准确,就能顺利编译。

Update:后来又做了尝试,原因应该是因为我的系统是64位的。